LEMP stands for Linux/Nginx/MariaDB and PHP. In contrast to LAMP, Linux/Apache/Mysql and PHP should be a server with Nginx somewhat faster than an Apache web server. How to install all this on a naked server with Debian minimum system is described in this article.
What’s the point?
I have been running my own project Supportnet.de on a server with LAMP environment for a few years now and I have to say that it works very well with WordPress. But now I made the experience that the performance of the website delivery has a not quite small influence on the placement in the Google search results. What is good for Google is also good for the visitor of a website, so it should be in any case and in this case it is of course so. The faster the pages are delivered the better the visitor experience.
The hardware is unlike before hardly a problem, if you really need performance you take a dedicated server. But even there there can be problems if the server software is not fast enough. Therefore I wanted to try out on a Hetzner CloudServer how much faster Nginx is compared to Apache. According to internet tests the Nginx is about 2.5 times faster than Apache for static HTML files and only a few percent for all other things. But, perhaps it depends on the few percent to get the own page better than that of the competition as the best search result.
What we need
- Cloudserver or dedicated server (from Hetzner or another provider) with Debian 10.x installed
- SSH access to the server
If you already want to work with a domain as address, and not with the IP number of the server, then the DNS (Domain Name Server Entry) of the domain should already point to the IP number of your server. Otherwise you have to enter your IP number wherever you see my_domain.
Login and Password
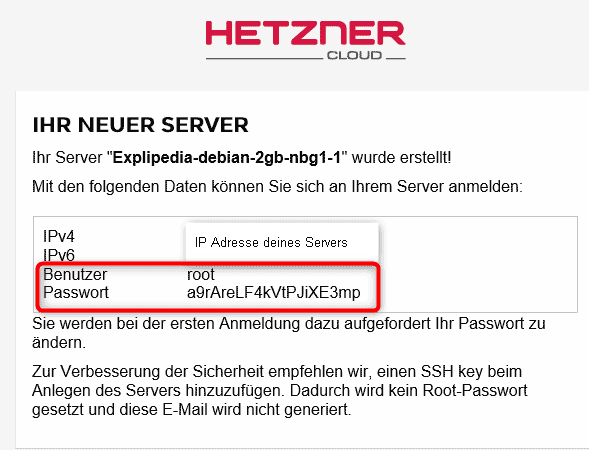
When setting up a new virtual server (cloud server) or a dedicated server (hardware server), Hetzner sends you a mail with the password for root and the IP number of the server.
So log in via ssh to the IP number and login data given in the mail. With dedicated servers you will probably not be asked to change your password immediately, with cloud servers this is the case. So you have to enter your password from the e-mail again and then type in a new one twice (and remember it well).
Updates and Upgrades
Now it is a good idea to update the server to the latest version. The images that are installed are not always fresh and we don’t want to have to live with outdated and insecure packages.
sudo apt update (reads the update list to determine which software packages can be updated)
sudo apt upgrade (then installs the software packages to be updated)
Install Nginx
Now that everything is up to date, you can simply use the command:
sudo apt install nginx
You can check if this worked by simply entering the IP address of your clooudserver (which is in the e-mail) into the address bar of your browser. If you already have a domain for your server and its DSN entries are already working, calling your domain in your browser should produce the same result.
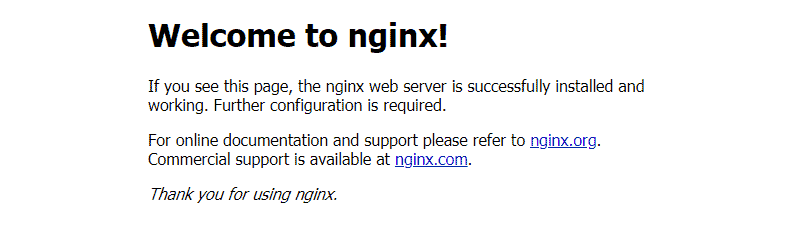
If you get this as an answer you have successfully installed the Nginx.
Install MariaDB Server
The web server is running. To save data or to install a CMS like WordPress you need a database server.
In our case MariaDB, the communit Fork from Mysql.
Install MariaDB
The current software package from MariaDB is called mariadb-server and is installed in this way:
sudo apt install mariadb-server
MariaDB absichern

If the installation of MariaDB was successful, it is important for security that you run a script that deletes and modifies a few things in MariaDB that could be a security problem.
sudo mysql_secure_installation
First, the script asks you for the root password, which is the database root password, not the Linux root password. Since the MariaDB database has just been installed, there is no password yet and you can simply press Enter/Return for an empty password.
- First, the script asks you for the root password, which is the database root password, not the Linux root password. Since the MariaDB database has just been installed, there is no password yet and you can simply press Enter/Return for an empty password. The empty password should stay that way, because MariaDB has no password for root, which doesn’t mean that you can log in without a password. The authentication procedure is just different and some MariaDB maintenance processes expect you to be able to log in this way.
- Now you will be asked if you want to assign a root password, which you should not do.
- The anonymous user, which is installed by default, should then be deleted. Confirm with „Y“.
- Now confirm the setting that the root user can only access the database from the local server and then delete the test database.
- Then the authorization tables are read in again, this should also be confirmed with y and the Secure Script and the database is ready for operation in the network.
Then the authorization tables are read in again, this should also be confirmed with y and the Secure Script and the database is ready for operation in the network.
Setting Up MariaDB for WordPress
As already written above under Secure MariaDB a MariaDB 10.x version runs on a Debian 10 system where the root user authenticates himself via a unix-socket plugin or other methods. So not with a password. This is important because for the administration of MariaDB you have to create another user with administrative rights.
For the administrative access from root to the MariaDB server you should not change the authentication options and not assign a password for the user root. The root user is used for many administrative purposes and should therefore work as expected by other services. Applications such as log file rotation and server start and stop require a root user account.
It is therefore recommended to create an extra user account for MariaDB with administrative rights.
Therefore we start the MariaDB SQL input with:
sudo mysql
We want to create a user with the name „admin“, the password „password“ and all rights for all databases. For this we enter the following in the following MariaDB prompt:
MariaDB [(none)]> GRANT ALL ON *.* TO 'admin'@'localhost' IDENTIFIED BY 'password' WITH GRANT OPTION;
Then read in the access rights again:
MariaDB [(none)]> FLUSH PRIVILEGES;
And now leave the MariaDB prompt:
MariaDB [(none)]> exit
Now all we have left to do is test the MariaDB installation.
Test the MariaDB
root@xxxxxxxxxx-debian-2gb-nbg1-1:~# systemctl status mariadb
root@xxxxxxxxxx-debian-2gb-nbg1-1:~# systemctl status mariadb
 ● mariadb.service - MariaDB 10.3.15 database server
    Loaded: loaded (/lib/systemd/system/mariadb.service; enabled; vendor preset: enabled)
    Active: active (running) since Sat 2019-08-24 13:36:36 CEST; 2h 43min ago
      Docs: man:mysqld(8)
            https://mariadb.com/kb/en/library/systemd/
  Main PID: 8086 (mysqld)
    Status: "Taking your SQL requests now…"
     Tasks: 31 (limit: 4585)
    Memory: 74.5M
    CGroup: /system.slice/mariadb.service
            └─8086 /usr/sbin/mysqld
 Aug 24 13:36:37 xxxxxxxx-debian-2gb-nbg1-1 /etc/mysql/debian-start[8124]: Phase 6/7: Checking and upgrading tables
 Aug 24 13:36:37 xxxxxxxx-debian-2gb-nbg1-1 /etc/mysql/debian-start[8124]: Running 'mysqlcheck' with connection arguments: --socket='/var/run/mysqld/mys
 Aug 24 13:36:37 xxxxxxxx-debian-2gb-nbg1-1 /etc/mysql/debian-start[8124]: # Connecting to localhost…
 Aug 24 13:36:37 xxxxxxxx-debian-2gb-nbg1-1 /etc/mysql/debian-start[8124]: # Disconnecting from localhost…
 Aug 24 13:36:37 xxxxxxxx-debian-2gb-nbg1-1 /etc/mysql/debian-start[8124]: Processing databases
 Aug 24 13:36:37 xxxxxxxx-debian-2gb-nbg1-1 /etc/mysql/debian-start[8124]: information_schema
 Aug 24 13:36:37 xxxxxxxx-debian-2gb-nbg1-1 /etc/mysql/debian-start[8124]: performance_schema
 Aug 24 13:36:37 xxxxxxxx-debian-2gb-nbg1-1 /etc/mysql/debian-start[8124]: Phase 7/7: Running 'FLUSH PRIVILEGES'
 Aug 24 13:36:37 xxxxxxxx-debian-2gb-nbg1-1 /etc/mysql/debian-start[8124]: OK
 Aug 24 13:36:37 xxxxxxxx-debian-2gb-nbg1-1 /etc/mysql/debian-start[8230]: Triggering myisam-recover for all MyISAM tables and aria-recover for all Aria
 lines 1-22/22 (END)
Create MariaDB database and database user for WordPress
WordPress expects an already existing database in which it can create its tables. You have to create it and also a user who has full access to the database has to be created. The WordPress documentation states that this user must have full access to the database. This is interesting because you only have to be able to create, change and delete tables and for security reasons you should only assign the required rights. But WordPress speaks of plugins that can demand more rights and therefore the user should have all rights for the WordPress database.
So we start the database prompt with:
root@xxxxxxxxx-debian-2gb-nbg1-1:~# sudo mariadb
you return to the command mode of MariaDB as root database user. This happens with the sudo command.
As you can see here you log in as a superuser and don’t need a root password. What looks like a security leak guarantees that only users with superuser privileges or processes that have them can log on to the database as root.
So nobody can log into the database via a PHP gap as root, because PHP is not executed as superuser.
To increase security, you should create a separate user for each database with limited rights for this database. This makes sense if you have several different applications with databases.
In this case we create a database called “test_database” an.
MariaDB [(none)]> CREATE DATABASE test_database;
And a user who is only allowed to access this database with the name “test_user” with the password “password” (here please enter a secure password again).
MariaDB [(none)]> GRANT ALL ON test_database.* TO 'test_user'@'localhost' IDENTIFIED BY 'password' WITH GRANT OPTION;
This user can create, update and delete tables in the database “test_database” but cannot create or change any other databases.
Then read in the authorizations again with:
MariaDB [(none)]> FLUSH PRIVILEGES;
And exit from the database
MariaDB [(none)]> exit
Now a test if you can login with the new user “test_user”.
mariadb -u test_user -p
If an error message appears, either the user name of the database user is incorrect or the password is incorrect.
Otherwise you are logged in and can immediately test which databases are available to you:
SHOW DATABASES;
Output
+--------------------+ +--------------------+
| Database           |
+--------------------+
| test_datenbank   |
| information_schema |
+--------------------+
2 rows in set (0.000 sec)

 +--------------------+
And now again „exit“ to leave the MariaDB prompt.
PHP Installation
Unlike the Apache web server, Nginx cannot interpret PHP itself. With Apache you can simply load PHP as a module and that’s it. In order for Nginx to be able to handle PHP, you need to install your own application for PHP to which Nginx can then pass the PHP calls.
For this we need „php-fpm“ („PHP fastCGI process manager“) which you also need for the Apache server if you want to use HTTP2 with it, because the PHP Apache module does not support parallel connections. You have to explain to Nginx that it should control the PHP fastCGI Process Manager with PHP. Additionally you need a module for PHP to access the MariaDB, which is called „php-mysql“.
WordPress requires some additional modules for PHP, without which it runs but then complains in the system overview. So it’s better to install them as well.
To install all enter the following command:
sudo apt install php-fpm php-mysql php7.3-gd php7.3-imagick php7.3-curl php7.3-bcmath
So now all PHP packages are installed. Now a small check which versions are installed.
php --version

 PHP 7.3.4-2 (cli) (built: Apr 13 2019 19:05:48) ( NTS )
 Copyright (c) 1997-2018 The PHP Group
 Zend Engine v3.3.4, Copyright (c) 1998-2018 Zend Technologies
     with Zend OPcache v7.3.4-2, Copyright (c) 1999-2018, by Zend Technologies

mariadb

 Welcome to the MariaDB monitor.  Commands end with ; or \g.
 Your MariaDB connection id is 150
 Server version: 10.3.15-MariaDB-1 Debian 10
 Copyright (c) 2000, 2018, Oracle, MariaDB Corporation Ab and others.
 Type 'help;' or '\h' for help. Type '\c' to clear the current input statement.
Configure Nginx for PHP
To be able to use multiple domains with Nginx, Nginx uses server blocks. These server blocks correspond to the virtual hosts of the Apache server. You can set different options for different web pages (domains), such as the document root for the web server. The server blocks also replace the .htaccess file of the Apache server and are therefore the place where you specify redirects or their rules.
Under Debian 10 a server block is preconfigured for Nginx whose document root is /var/www/html. So if you call the IP address of the server or have a DNS entry for a domain point to this IP address, you can call the default configuration. It shows what files are stored under the default document root. In our case under /var/www/html the file „index.nginx-debian.html“ is displayed.
Since I want to host several domains on the server myself, I will explain briefly how to create virtual hosts with Nginx.
Create Server Block
First we create a document root for the first domain, in my case my_domain
sudo mkdir /var/www/my_domain
Adapt the rights of the directories
sudo chown -R www-data:www-data /var/www/my_domain
Now we create a new server blocks configuration file in the folder
/etc/nginx/sites-available/my_domain
I always use the vi, you can use your favorite editor for that.
sudo vi /etc/nginx/sites-available/my_domain
Then inserts the following configuration into this text file:
server {
    listen 80;
    listen [::]:80;

    root /var/www/my_domain;
    index index.php index.html index.htm;

    server_name my_domain;

    location / {
        try_files $uri $uri/ =404;
    }

    location ~ \.php$ {
        include snippets/fastcgi-php.conf;
        fastcgi_pass unix:/var/run/php/php7.3-fpm.sock;
    }
}
This basic configuration lets Nginx listen on port 80 and distribute files from your web root directory /var/www/my_domain. This configuration (server block) only responds to requests that exactly match your specified domain name. All PHP requests will be forwarded to php-fpm and then, after processing, delivered again.
Then create a softlink to the file so that the configuration of the domain is executed:
sudo ln -s /etc/nginx/sites-available/my_domain /etc/nginx/sites-enabled/
Now a check whether the configuration does not contain any errors is included:
sudo nginx -t
And the obligatory restart of the Nginx server:
sudo systemctl reload nginx
So now the server should run and also interpret PHP.
Test PHP for Nginx
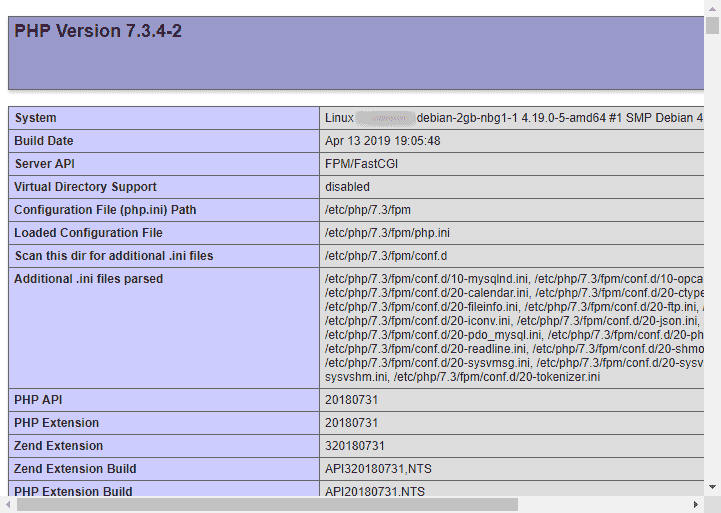
We test this quickly with a small PHP info file, which is quickly generated. Take your favorite editor and create a file info.php in which you write the following:
<?php
phpinfo();
Now calls the file via your browser with the address:
http://my_domain/info.php
As a result you should get a website with very detailed information about your server.
If you need to change the PHP configuration you can restart PHP with this command: systemctl restart php7.3-fpm.
Setting up Nginx for WordPress
What is interesting here is that Nginx does not have a .htaccess file like Apache where you can define redirections. This all has to be done in the configuration of a server block of Nginx. Therefore we change our first server block configuration file so that Nginx can do the redirections WordPress needs.
Plugins that depend on .htaccess can only be used with workarounds with Nginx.
So edit again the file
/etc/nginx/sites-avaiable/my_domain
Und tragt dort folgendes ein.
server {
   server_name my_domain;
   listen 80;
   root /var/www/my_domain;
   access_log /var/log/nginx/access.log;
   error_log /var/log/nginx/error.log;
   index index.php;
   gzip  on;
   gzip_vary  on;
   gzip_min_length  100;
   gzip_buffers  16 8k;
   gzip_proxied  any;
   gzip_types
     text/plain
     text/css
     text/javascript
     application/json
     application/javascript;

   location / {
     try_files $uri $uri/ /index.php?q=$uri&$args;
   }

   location ~* \.(jpg|jpeg|gif|css|png|js|ico|html)$ {
     access_log off;
     expires max;
   }

   location ~ /\.ht {
     deny  all;
   }

   location ~ \.php$ {
     fastcgi_index index.php;
     fastcgi_keep_conn on;
     include /etc/nginx/fastcgi_params;
     fastcgi_pass unix:/run/php/php7.3-fpm.sock;
     fastcgi_param SCRIPT_FILENAME $document_root$fastcgi_script_name;
   }
 }
Note: If you are using a different PHP version, you will need to change the line in the „fastcgi_pass unix:/run/php/php7.3-fpm.sock;“ line here. You can read your PHP version like this: php –version
If you change the PHP configuration or a Nginx Server Block you have to restart the Nginx Server:
sudo systemctl reload nginx
If the server is running with this configuration then you should be able to install WordPress now.
Install WordPress
So the server is running and PHP and MariaDB are ready to process the first WordPress data. So let’s install WordPress in the document root of our domain. Therefore we have to download the WordPress package from www.wordpress.org So change to your document root of your server to /var/www/your_domain and execute the command there.
wget https://wordpress.org/latest.tar.gz
Unpacking goes with
tar xfz latest.tar.gz
This is the link for the German version
wget https://de.wordpress.org/latest-de_DE.tar.gz
The WordPress files are now unpacked into the folder „wordpress“, which we don’t really want. Therefore we move the files back into the document root of our server.
mv wordpress/* .
rm -r wordpress
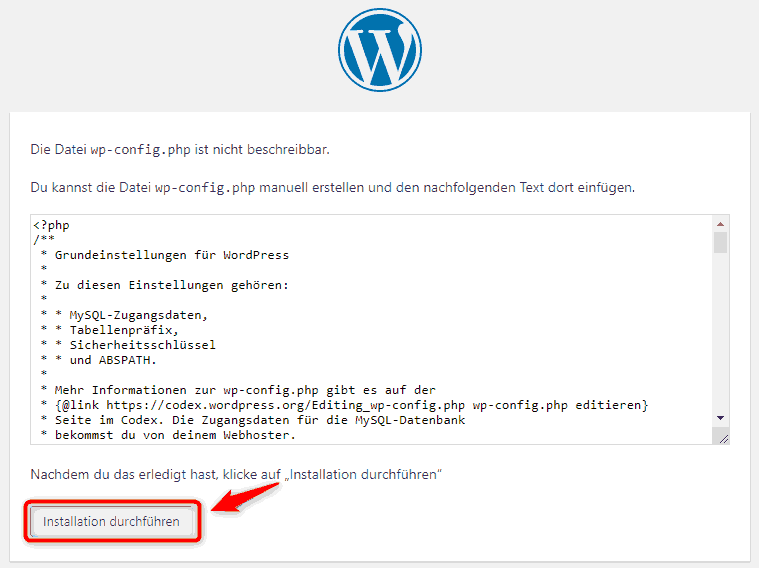
We could now create the wp-config.php file and enter our data for database access and everything else there, but WordPress makes it easy and lets you enter everything conveniently via your browser. To do this, open your domain in your browser, in our case www.deine-domain.de . It is important that you have changed the file permissions before for the user www-data, otherwise WordPress can not write to the wp-config.php file (above all you save the annoying entering of random characters for the salt addition for the encryption in the database).
chown -R www-data:www-data /var/www/my_domain
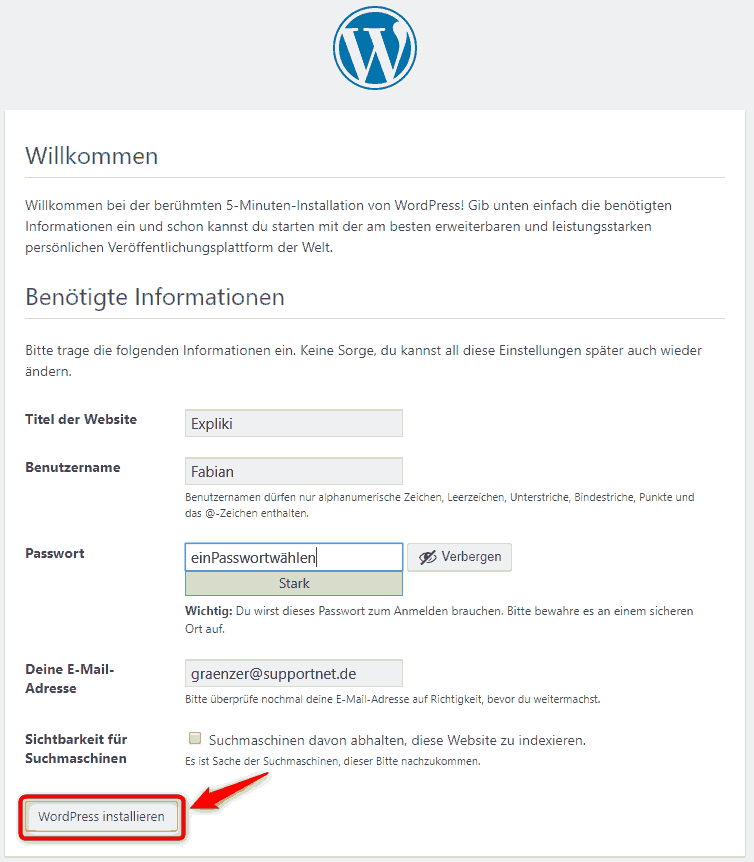
Now that all files are unpacked, in the right place and with the right permissions set, we can make a first attempt at installing WordPress from the browser. Enter your domain address in a browser, in our example my-domain. The page that should appear now looks like this.
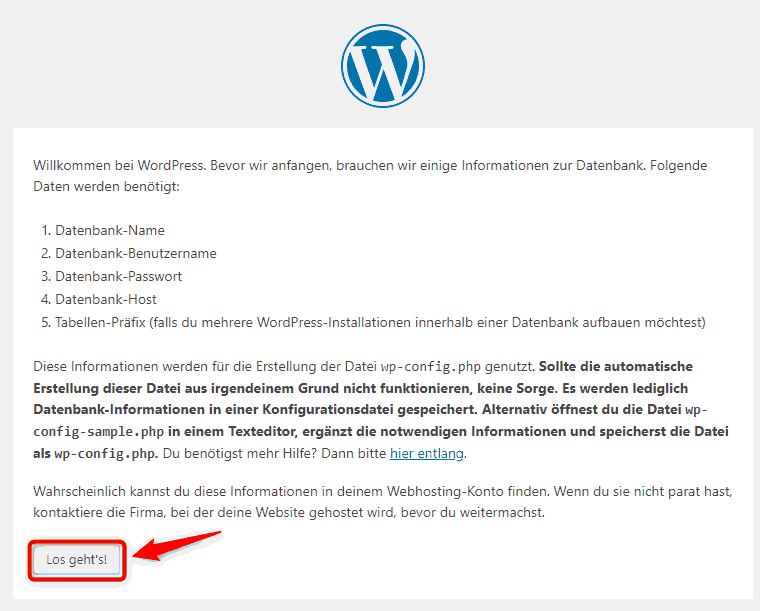
Click on „Let’s go“ and you will come to the following page where you have to enter your database access data.
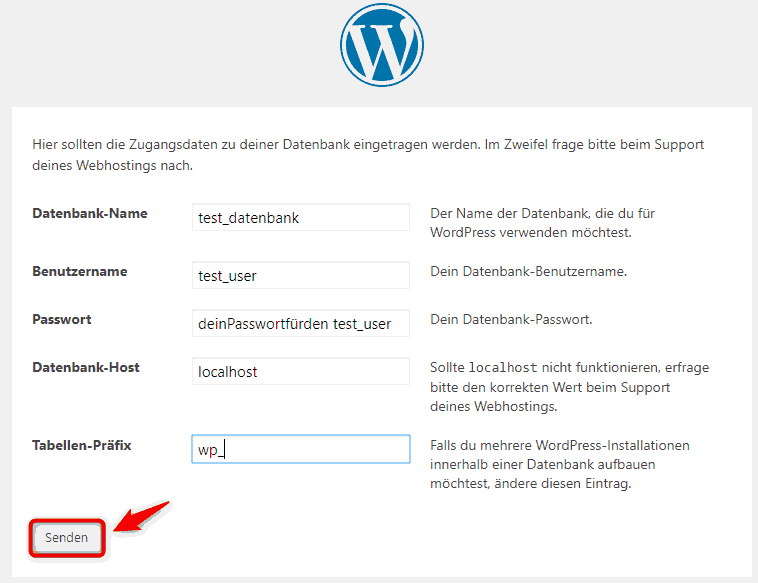
What is important here is that you have set up the access data in the section „Create MariaDB database and database user for WordPress“ above. With the table prefix you can also think of something other than wp_, which makes it a bit harder for potential attackers, because they don’t already know what the database tables are called before. It doesn’t matter for WordPress, because the prefix is freely selectable.
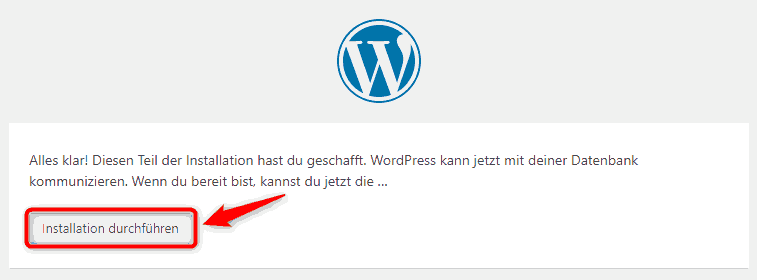
Now you can start the installation. If something doesn’t work with the database you will get an error message. Most of the time you mistyped the entered data. Even if your files are not yet writable for the user www-data you get an error message a la:
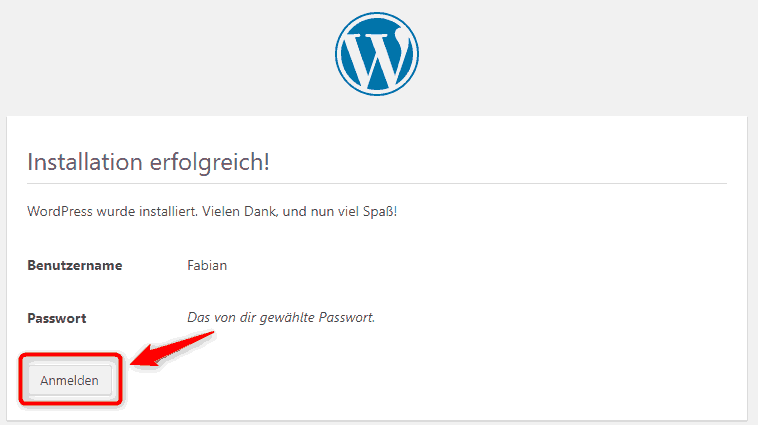
Eureka, all done. WordPress runs and works with a current Nginx server, with PHP 7.x, MariaDB and WordPress itself.
The cool thing about Hetzner’s cloud servers (it’s the same with all other providers) is that you can copy them back and forth, take snapshots before making a tricky change and extend them quite well. If you need more CPU power you can book additional CPUs, or more RAM or what’s also very cool just mount more disk space. On one of my test servers I simply mounted an additional 40 GB of disk space on /var/www/html to have more space for data (this costs about 2-3 Euro more per month). So everything is very flexible.
Conclusion
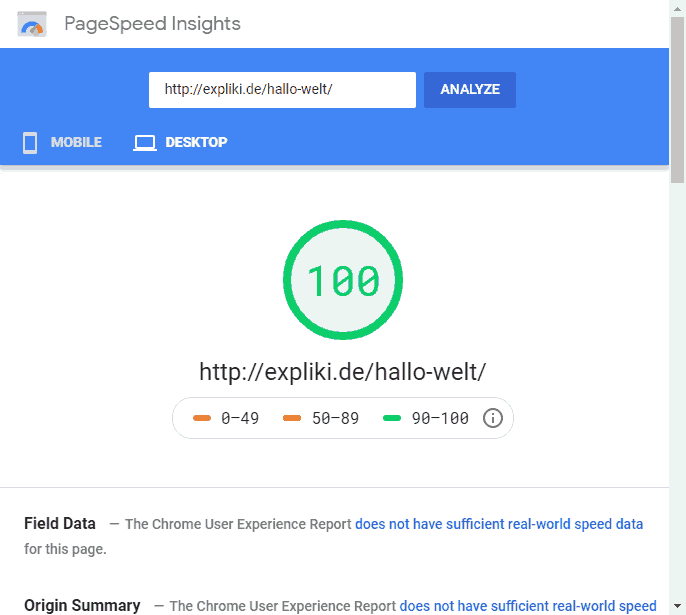
If all goes well, you have installed such a WordPress installation on your server in an hour. Unfortunately everything doesn’t always work right away. If the server is running, it is really fast. My first speed tests with the WordPress installation still without additional plugins and little content show a good result with Google Page Speed Insights, for the desktop version 100% and for the mobile 95%. Of course, this all changes when the database is full and more than one user accesses the page. A good result for a virtual server with only two CPU cores, 4 GB RAM and 20 GB disk space.

With the snapshot function of the cloud servers I will now do some performance tests with data and different configurations.
Advertising and sponsoring
So I’m raving about Hetzner as provider for our server and that’s due to the almost 20 years of experience I’ve had with Hetzner. The support of Hetzner was always very helpful and has us in emergencies always tried to offer a good solution, so also thought how to solve an emerged problem.
Therefore I write it out here again, I did not get any advantages by this article from the company Hetzner, but what is not can still become ;-)
Hinterlasse einen Kommentar
Du musst angemeldet sein, um einen Kommentar schreiben zu können.